 |
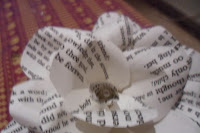
| My first 'Book in Bloom' |
After some playing around I have managed to make a paper rose! and I thought I would share how I did it as well as another method to create flowers from old books.
Firstly you need to cut your petals...
I found the easiest way to get the right amount of petals is to lay the 4 pages on top of each other and then cut 5 sizes of petals.
The smallest shape was about 2cm x 3cm while the largest was 4cm x 6cm
You will also need an elongated shape for the center (3cm x 2cm) and four small strips of paper (5cm x 1cm)
To shape the petals I use one of the skewers/sticks to roll the edge of the shape, I would vary where the curve was placed (in the center, a little on each side etc..). You than need to pinch the base of the shape, this will help the flower form a bowl shape as the petals won't sit flat on each other.
I also wanted to share a method to make cute, small roses, that I discovered online
So there you have it, my attempt at turning Shakespeare's words into floral decorations - I have to say I LOVE them and now I just need to figure out how I can include them into my day, without it looking too much like a children's craft project exploded over the church.
Coming soon in 'Pages of Style': wreaths, confetti and bunting.
TTFN ~ Kate xx
(I have used Romeo & Juliet to keep my chosen Shakespeare play a secret)
4x pages of a book/play
1x glue gun & spare glue stick
scissors
2x bamboo sticks/skewers
small pearl bead (optional)
tweezers or extra skewers (to assist with placing petals as glue get hot)
I found the easiest way to get the right amount of petals is to lay the 4 pages on top of each other and then cut 5 sizes of petals.
The smallest shape was about 2cm x 3cm while the largest was 4cm x 6cm
You will also need an elongated shape for the center (3cm x 2cm) and four small strips of paper (5cm x 1cm)
To shape the petals I use one of the skewers/sticks to roll the edge of the shape, I would vary where the curve was placed (in the center, a little on each side etc..). You than need to pinch the base of the shape, this will help the flower form a bowl shape as the petals won't sit flat on each other.
 |
| Curling around a skewer gives definition |
 |
| The finished petal |
 |
| Pinch the base of the petal, creating a central fold |
 |
| Finished petals |
 |
| Spiral at the center |
Once you have shaped all the petals, its is time to assemble your bloom.
Starting with the short long piece we cut (but do not need to shape) place a line of glue along the bottom and twist it around a wooden skewer, creating a small spiral.
From now on its all about layering the petals - starting with the smallest shapes, glue the along the bottom and ensure each petal slightly over laps the previous one.
Take you time, and be careful as the glue can be very hot. Also allow each petal a few seconds before you add the next, to give the glue a moment to set and prevent the shape being moved.
As you build up the rose, you may find that also putting some glue along the fold (to about one 3rd along) will hold the petal in place a little more sturdily.
 |
| Place 2 of the rectangles either side of the skewer |
 |
| Add the other 2 rectangles at right -angles |
When you have finished layering you need to secure the base, to hold the bottom petals in place and prevent the flower from slipping down the skewer. Simply glue the four strips you cut, creating a square shape. Hold the rose upside down for about 5 minutes to allow the glue to dry, and again to prevent the shape shifting and dropping.
 |
| Pearl detail |
For a final flourish, make a diagonal cut to the central spiral, add a drop of glue and place a (pearl) bead into the hole (width of the skewer)
So there you have it, my attempt at turning Shakespeare's words into floral decorations - I have to say I LOVE them and now I just need to figure out how I can include them into my day, without it looking too much like a children's craft project exploded over the church.
Coming soon in 'Pages of Style': wreaths, confetti and bunting.
TTFN ~ Kate xx


This comment has been removed by a blog administrator.
ReplyDelete